1. Installing the App
CheckIn is a Progressive Web App (PWA) — you can install it directly from your browser without going through an app store. Follow the steps for your device below.
iOS (iPhone / iPad)
- Open the CheckIn URL in Safari.
- Tap the Share button (the box with an arrow pointing up) at the bottom of the screen.
- Scroll down in the share sheet and tap Add to Home Screen.
- Confirm the name and tap Add in the top-right corner.
- The CheckIn icon will appear on your home screen and launch like a native app.
Android
- Open the CheckIn URL in Chrome.
- Tap the three-dot menu (⋮) in the top-right corner of Chrome.
- Tap Add to Home screen.
- Confirm the name and tap Add.
- The CheckIn icon will appear on your home screen and launch like a native app.
2. Login
All volunteers share a single password for the event. You will receive the password from your event coordinator.
- Open the CheckIn application in your browser or on your device.
- Enter the shared password provided by your coordinator.
- Tap Login.
- You will be taken directly to the Event Setup screen.
3. Event Setup
Before you can access the check-in dashboard you must complete a short setup step. This ties your check-ins to the correct location and records your name as the registrar.
- Enter your full name in the Registrar Name field. This is recorded with every check-in you perform. The app will remember your name for the next time you use it.
- Select the event location from the dropdown. Only active locations (within their start/end date range) appear in the list.
- Tap Continue to go to the main dashboard.
4. Main Dashboard
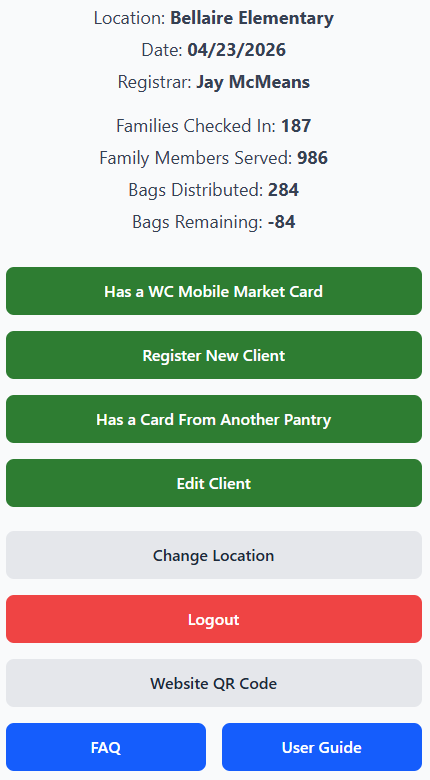
The dashboard is your home base during an event. It shows real-time statistics and provides access to all major actions.
The dashboard displays four live stats for the current event:
- → Families Checked In — the number of distinct families that have been checked in at this location today.
- → Family Members Served — the total number of individuals served, summed across all checked-in families' household sizes.
- → Bags Distributed — the total number of food bags that have been given out today, based on each family's PostIt number.
- → Bags Remaining — the number of bags still available at this location for the event.
These stats update automatically each time the dashboard is displayed and refresh every 15 seconds, so the numbers always reflect current event activity.
From the dashboard you can:
- → Check In a Client — search for an existing registered client and check them in.
- → Register New Client — add a brand-new family and issue them a card.
- → Has a Card From Another Pantry — check in a client who holds a card from a different food pantry.
- → Edit Client — find and update a client's information.
- → Change Location — return to Event Setup to correct the selected location.
- → Website QR Code — display a QR code clients can scan to visit the WC Mobile Market website.
5. Checking In a Client
Use this flow when a returning client arrives at the event with their existing Mobile Market card.
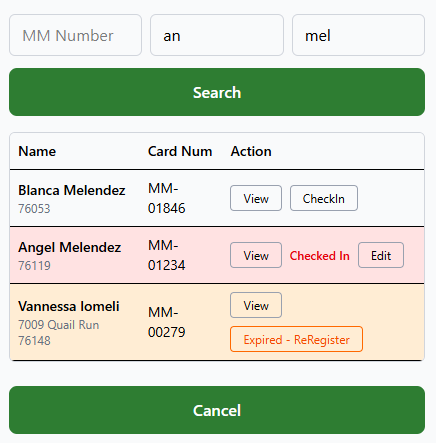
Search for the client
On the main dashboard tap Check In a Client. Enter any combination of card number, first name, and/or last name. Partial matches work — searching the first 2–3 characters of a name often returns better results than the full name. Tap Search.
Select the correct client
Results appear in pages of 10. Each result row may display a status badge:
- Expired The client's card has passed its expiration date. Tapping their row begins the requalification flow — the New Client registration form opens with their existing name, address, and family size pre-filled. Review and confirm the information, make any necessary corrections, then complete the Qualification Wizard to issue them a new card. See Section 8 for full details.
- Already Checked In The client has already been checked in at this location today. Their row is highlighted in red and cannot be selected again — the system prevents duplicate check-ins on the same day.
If no badge is shown, the client is active and available. Tap their row to open the confirmation screen.
Confirm the client details
Verify the name, address, family size, and card number match the physical card. Tap Correct Client to complete the check-in.
Record the PostIt number
A success modal shows the client's name, card number, and their PostIt Number (food units). Write that number on a sticky note and give it to the client so they can collect the correct amount of food.
Tap "Awesome" to finish
The modal closes and the dashboard statistics update automatically.
6. Registering a New Client
Use this flow when a family is visiting for the first time and has no existing card.
Open the registration form
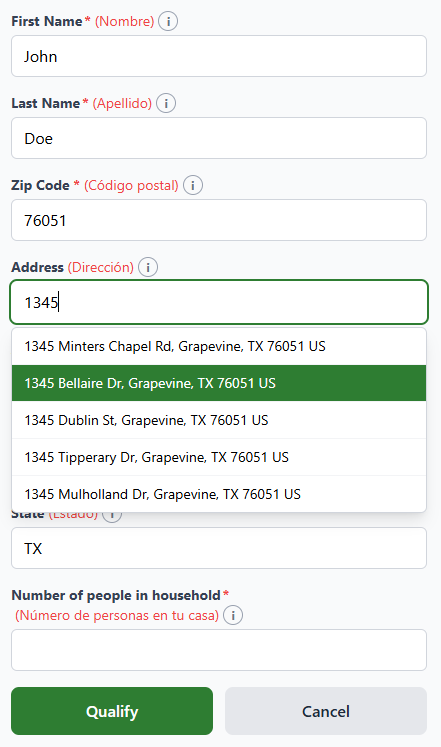
Tap Register New Client on the dashboard.
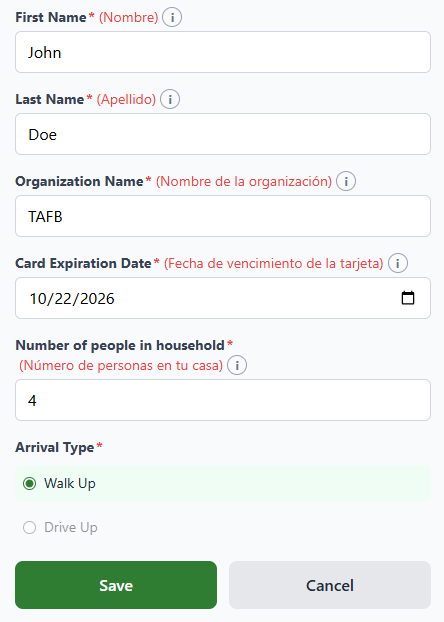
Enter client information
Required: Full name, family size, and zip code.
Optional: Street address, unit, city, state, and a manual card number (leave blank to auto-assign).
Name is parsed automatically — "John Michael Smith" becomes First: "John", Last: "Michael Smith".
The zip code and address fields both support autocomplete — as you type, matching suggestions appear in a dropdown. Selecting a suggestion automatically fills in the address, city, state, and zip code fields, saving time and reducing entry errors.
Proceed to the Qualification Wizard
After all required fields pass validation you are taken to the 3-step Qualification Wizard. See Section 7 for details.
7. Qualification Wizard
The wizard determines eligibility through up to three steps. The system stops at the first step where the client qualifies.
1 Program Enrollment
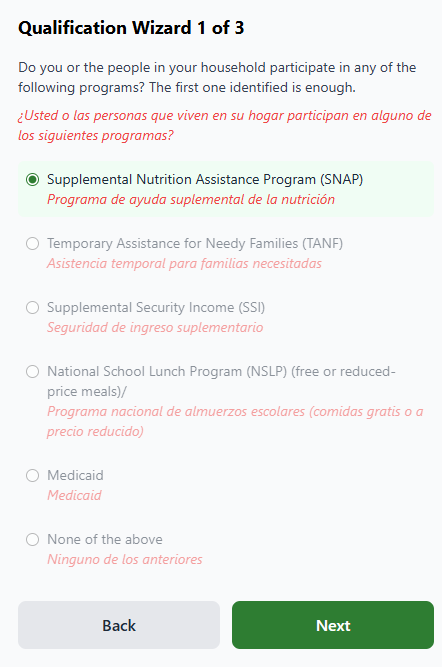
Ask: "Are you currently enrolled in any of these programs?"
- • SNAP (Food Stamps)
- • SSI (Supplemental Security Income)
- • TANF (Temporary Assistance for Needy Families)
- • NSLP (National School Lunch Program)
- • Medicaid
If the client selects any program → qualified. Card expires in 12 months. Wizard jumps to Card Details.
If "None of the above" → proceed to Step 2.
2 Income Verification
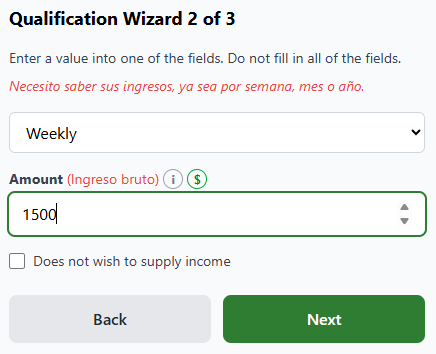
Ask for the household's gross income. Select the time period and enter the amount.
Time period options: Yearly, Monthly, Twice Monthly, Bi-Weekly, Weekly
The system checks the amount against current H1640 SNAP thresholds (updated annually on July 1st). Families larger than 8 use the 8-person threshold.
If income ≤ threshold → qualified. Card expires in 12 months. Jump to Card Details.
If income exceeds threshold → proceed to Step 3.
3 Crisis Justification
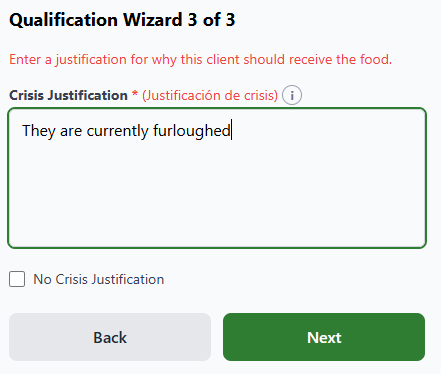
If the client does not qualify via program or income, describe the crisis situation in the text field. This field cannot be left blank.
Crisis-justified cards expire in 6 months (shorter than the standard 12 months).
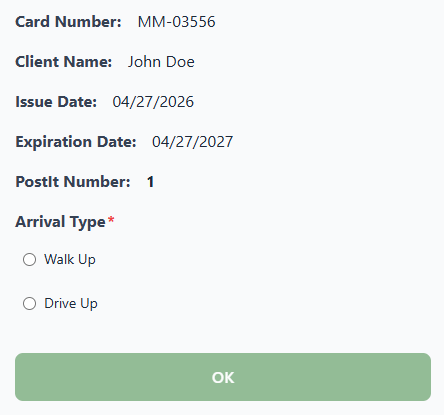
Card is created and client is checked in
Once the Qualification Wizard is complete, a card is automatically created and the client is checked in. The success modal shows the card number and PostIt number. Write the card number on a physical card and hand it to the client.
8. Expired Cards
When a client's card has passed its expiration date the system automatically routes you through a requalification flow to issue them a new card.
Don't worry about it — just check the client in like normal and let the system do the work. It will guide you through each step automatically.
Search for the client as normal
Use the standard Has a WC Mobile Market Card flow on the dashboard. Search by card number, first name, and/or last name just as you would for any returning client. The expired client will appear in the results with an Expired indicator on their row.
Tap "Expired - ReRegister"
Tap the Expired - ReRegister button on the client's record. This opens the edit client page with all of their existing information already filled in — no need to re-enter anything from scratch.
Confirm the client's information
Review each field with the client — name, address, family size, and zip code. Update anything that has changed since their last visit. Once everything is accurate, tap Qualify to proceed.
Complete the Qualification Wizard
The client must step back through the full Qualification Wizard to confirm they are still eligible. This works exactly the same as a new registration — program enrollment, income verification, or crisis justification. See Section 7 for details.
New card is issued and client is checked in
Once qualification is complete, a new card is automatically created and the client is checked in. The success modal displays the new card number and PostIt number. Write the new card number on a fresh physical card and hand it to the client. Collect the old card — do not return it, as it is now invalid and could cause confusion at future events.
9. Other Pantry Cards
Clients who hold cards from other food pantry organizations can be checked in using the Other Pantry flow.
Tap "Has a Card From Another Pantry"
From the dashboard, tap this button to open the Other Pantry search.
Search for the client first
The client may have attended a previous Mobile Market event. Search by name or by the MM number written on their card. If found, simply check them in.

If not found — Quick Registration
Tap Register New (Other Pantry) and fill in the client's first name, last name, card expiration date, and number of people in the household.
For Organization Name, tap the field to see a dropdown list of known pantries. Select the client's pantry from the list. If their pantry is not listed, simply type the name in the field to enter it as a new organization.
Write the MM number on their card
After saving, the system assigns an MM-nnnnn number. Write it on the client's physical card (e.g., MM-00542). At future events, volunteers can find this client by searching that number through the Other Pantry flow.
10. Editing a Client
Use the Edit Client feature to correct mistakes in a client's record — name, address, and family size. The card number cannot be edited.
Tap Edit Client on the main dashboard.
Search for the client by name or card number.
Select the client from the results to edit their current information.
Make your corrections and tap Save.
The record is updated in the database and you are returned to the previous screen.
Edit Client can also be reached from the check-in confirmation screen if you notice an error just before confirming a check-in. After saving the edit you can complete the check-in with the updated information.
11. Change Location
If you selected the wrong location during Event Setup, use the Change Location button on the dashboard to correct it. Tapping it takes you back to the Event Setup page where you can select the correct location and continue.
12. Website QR Code
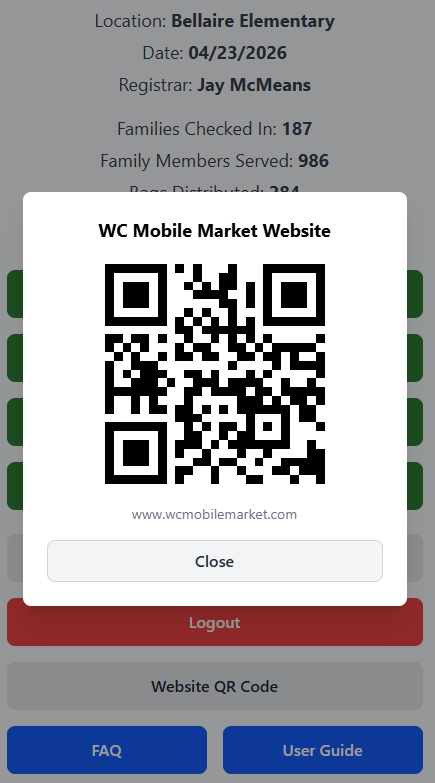
The Website QR Code button on the dashboard displays a full-screen QR code that clients can scan with their phone camera. Scanning it navigates them directly to the WC Mobile Market website at wcmobilemarket.com.
The website contains the event calendar showing all upcoming distribution dates and locations. Clients can use it to find out when and where we will be serving in their area.